
We have seen the question pop up recently about the order in which you add greenery and sola wood flowers to your arrangements. The answer is simple - either way works! I tend to create a greenery base first but wanted to show you in this blog how to make a funky junk centerpiece using (mainly) flowers first!
Let's get started:
Choose Your Paint Colors!

Hopefully by now you have heard that Oh You're Lovely carries it's very own wood flower dye and glycerin collection! The color combination above might just be my favorite and brings a fantastic moody spring vibe to any piece.
Select Your Flowers!
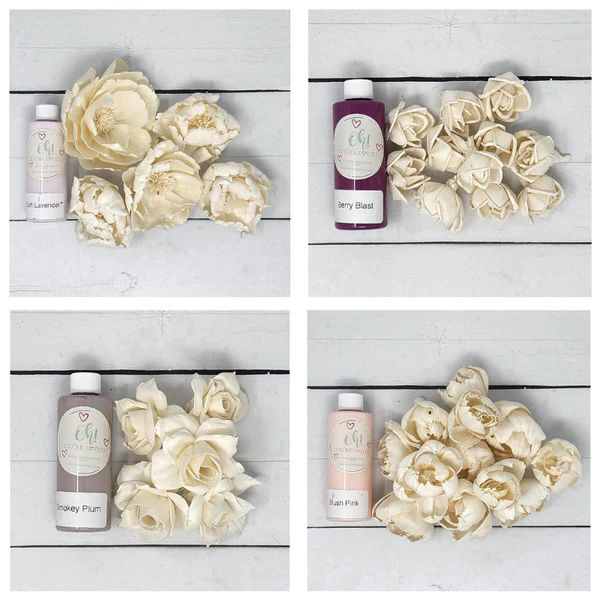
For this project, I used the following flowers/dyes:
Top Left: Charleston (3" & 4")/Soft Lavender
Top Right: Thelma (1.5")/Berry Blast
Bottom Left: La Fleur (2.5" & 3")/Smokey Plum
Bottom Right: Ruffled Peony (1.5" & 2.5")/Blush Pink
Dye Your Flowers!

Every flower was dip dyed in a 50/50 water to paint mixture (a good sized dollop of glycerin was also added) except for the blush pink. With those, I actually used 12 ounces of water for the 4 ounces of paint. I wanted a more subtle variation of the pink but even with diluting the paint with that much water, I was still able to get a full coverage paint!
Once the flowers are dry, you will want to stem them using 18 gauge floral wire.
Choose Your Greenery/Fillers and Prep Them!

Since we will be adding the majority of the greenery and filler after the flowers are already in the arrangement, I wanted to select greenery and filler that could easily be broken down into smaller pieces with maximum impact.
From left to right - sage greenery, spring eucalyptus mix with berries, white astilbe (this one is out of stock but the cream astilbe would work very well with this combo!) and Italian ruscus.
To prep the greenery, you will want to break them down into individual pieces or smaller, mini bunches. This quick tips blog will walk you through our recommendations on how to do that!
Select Your Container and Add Foam!

How adorable is this wooden log basket?! It was something I had bought for my dining room table to decorate for winter (it came with fresh pine/berries/pinecones) but I thought it would be perfect for a spring arrangement as well! Since the basket is made of wood, I just hot glued a piece of foam right in the middle.
Add Greenery to the Container Edges!

I know the idea of this blog is to show you how to create an arrangement using the flowers first. But! What you see above is the teeny tiny amount of greenery I added before the flowers. This is just a small amount that is in place mainly to give a bit of a cascading look around the corners. The lower left corner that does not have greenery is where we will be adding our focal flower.
Add Your Focal Flower!

I always like to place my focal flower (usually the largest and/or the flower dyed in a unique way) first to make sure it gets to top spot in the arrangement! For me, that is always off-center, usually to the left. This soft lavender 4" Charleston is not touching the foam or the container edge but is instead floating a bit.
Add All Flowers!

I started by adding in 3 of each color flower in triangle shapes throughout the wood basket to ensure the colors and styles were incorporated throughout. Once those were in, I kept adding flowers until the gaps were small enough for 1-2 pieces of greenery/filler to fill them!
Add Greenery and Fillers!

Next, I added the individually stemmed greenery and filler bits into the gaps. Again, I wanted to make sure they were balanced throughout the piece. For this part, you want to be very careful and gentle when moving/pushing the flowers aside so you have room to put them in those spots.

And there you have it! A beautiful spring piece using our sola wood flower dyes, flowers, greenery/filler and all started (pretty much) with the flowers first!
© 2026 Oh! You're Lovely - Sola Wood Flowers, All rights reserved. |
