
What happens when you combine a thrift store candlestick holder, a fake pumpkin and some greenery and sola wood flowers? Turns out, a very pretty home decor piece! Read on to see how it all came together.
What You'll Need:

Here is what I used for this project:
Pumpkin
- This is a large pumpkin I picked up from Target!
Greenery
- Artificial Seeded Large Teardrop Eucalyptus
- Boxwood with cream filler hanging
- Two Tone Angel Vine
- Artificial Heather | Mustard Yellow | Faux
Flowers
- Sophia
- Miss Ivy
- Shasta
- Quincy
- Sundance
- Charlotte
What You'll Also Need:

You'll also need:
Candlestick holder
- This is one I purchased from a thrift store!
Small piece of foam
- This is from the Dollar Store
Paint the Candlestick!
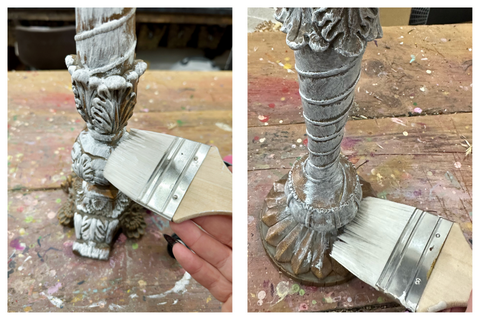
The candlestick holder I had purchased from the thrift store was a bit too dark for the look I was going for. To lighten it up, I dry brushed white paint directly onto it.
To do this, dab your paint brush into a small amount of paint and just gently brush it on the candlestick. Once finished with the initial painting, flip the candlestick holder upside down for extra coverage.
The best part about using a dry brush technique is that it dries quickly and you can move right along to the next step!
Add Foam!

I found the perfect sized piece of foam at the dollar store to place on top! I glued it on using my super high heat Ryobi cordless glue gun and the full centerpiece has stayed together well. If you have any concerns about the foam possibly popping off of the candlestick, you can either use Gorilla hot glue sticks or a dab of E6000 in the center (with hot glue around it to help it set more quickly).
Add the Pumpkin!

I attached this foam pumpkin with hot glue right to the top of the foam disc. For a little extra stability, you could also insert a 2-3" cut down bamboo skewer into the foam disc and slide the pumpkin onto that (still using hot glue to secure the pumpkin to the foam).
Pro Tip: Add Holes to the Foam!

The one thing I didn't love about the dollar store foam was that it was pretty hard to poke my greenery stems into. To help them slide into the foam, I pre-poked holes into the foam using the pointy end of a bamboo skewer and glued the greenery into place!
Add Greenery!

The next step is to add our greenery!
Left pic: I started with the large teardrop eucalyptus as the leaves are big and boldly colored.
Middle pic: I then added the boxwood with cream filler as this specific greenery has a lot of volume and can fill up large spaces.
Right pic: Lastly, I used the two toned angel hair greenery. It is delicate and brings the yellow tones of the large teardrop eucalyptus into harmony with the greens of the boxwood.
Since we are adding quite a few flowers, I saved the mustard colored heather to add in at the end of the project.
Start Adding Flowers!

First things first when it comes to the sola wood flowers! I wanted them to be a variety of different fall colors so I dyed them (hints on how to dye the flowers in this blog), let them dry overnight and then I stemmed them onto 18 gauge floral wire by adding a dab of glue to the back of the flower and inserting the wire.
To add the flowers to the piece, I worked in groups of 3 flowers at a time. I selected one flower style/color and added 3 of those flowers, making sure they were placed in a triangle around the base of the pumpkin. I alternated flower colors (between darker flowers and the different yellows) to make sure those colors were shown all around the base!
Keep Adding Flowers!

I kept adding different style flowers until the foam was completely covered.
Add Your Final Fillers!

Once all of the flowers had been placed, I added in the mustard heather filler as accents.
The Finishing Touches!

And there you have it! To showcase this centerpiece in my home decor, I added a couple pumpkins near the bottom of the candlestick and the display is complete for a beautiful fall look!
© 2026 Oh! You're Lovely - Sola Wood Flowers, All rights reserved. |
