
Looking for some home decor ideas? Preparing for your wedding and need some centerpiece inspiration? Have a great vase but not sure what to put in it?
Here is a great way to take some sola wood flowers, greenery and a vase and turn them into an interchangeable centerpiece!
What You'll Need

Here is what you'll need:
- Sola Wood Flowers find them all here
- Acrylic paint (for the flowers)
- An assortment of greenery and filler (we used lambs ear, laurel and tiny white spring flowers)
- A Vase or Vessel
- Spray paint (optional for the vase/vessel)
- Floral Wire Stems (18 gauge preferred)
- Hot Glue
- Wire Cutters
Prep Your Flowers!

Normally, your first step is to choose which flowers you want to use and your color story. Once you know the colors, it is time to start dyeing the flowers! We have done a few tutorials on how to dye sola wood flowers so feel free to scroll through our past blogs to find any of those for a more detailed how-to for this part
Luckily for me, I had these flowers left from the welcome wreath I made. Since they were already painted, all I needed to do was glue them onto floral wire. I used 18 gauge wire and hot glue to complete this step.
Paint Your Vase! (Optional)

I love metallics (and gold) and wanted to bring in a pop of shiny with my centerpiece. I used my cylindrical vase from Dollar Tree and spray painted it with Rust-Oleum Metallic Gold (you can use any spray paint color to bring in an accent color. Anyone up for trying a hot pink?!).
Once completely dry, I gave it a coat of Rust-Oleum Flat Protective Enamel. This helps to seal the paint and makes it much easier to wipe off fingerprints!
Prep Your Greenery and Filler!
Greenery and filler usually come in bunches of stems. I find it easiest to use single stems while building my bouquets and other arrangements and here are some of my go-to moves to prepare them!
- Use your wire cutters to remove each individual stem from the bundle. I cut as close to the "handle" as possible.
- Remove the leaves/filler that are close to the base of the individually cut stem. You'll only need the top section (at most around 4" from the tippy top for a small bouquet), so pull off the pieces below that. Use scissors or wire cutters to remove the extra nubs from the stem. We will stem those extra leaves next!
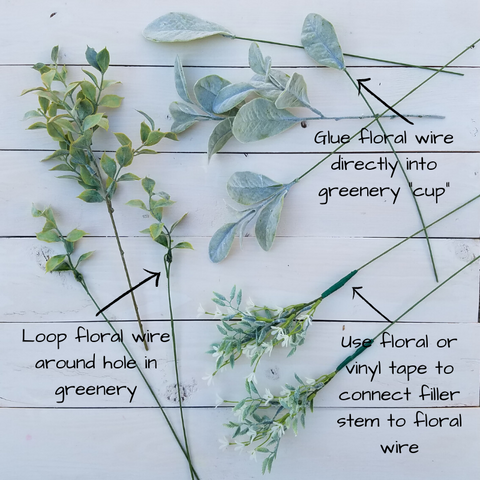
- Some leaves have a little "cup" at the bottom which is how they held onto the original stem. You can glue the floral wire directly into that cup. See the lamb's ear (top right) in the picture above as an example.
- Other leaves/filler have a hole at the base. For these, I like to insert my floral wire into the hole and loop it over. You can use needle nose pliers to secure it into place or just give it a tight squeeze with your fingers. The laurel above (on the left) is a good example of how to do this!
- Some fillers may have very short stems after you cut them from the handle. To lengthen them enough to place into bouquets, I will use floral tape or vinyl tape to attach a separate floral stem (as seen with the tiny white spring flowers in the lower right of the above picture).
While this is a relatively easy task, it can be tedious and take a bit of time. Throw on whatever show you're binging on these days and get going!
Build Your Greenery Base!

Ok. So here is the part that's a little more "art" than "science." There's no fixed formula for how to build this base. You'll have to add one piece of greenery. Then another. Then a third.
Do they work well together? If not, try bending, re-shaping, and rearranging until something starts to FEEL right. Then, do another batch of three. And another.
To make sure your hand doesn't get too tired or cramped up while you are building this base, you can use floral tape, vinyl tape or a zip tie to hold everything together as you add pieces in.
Keep going until your base has the gist of the shape you are wanting. It doesn't need to be perfect right now as it will move around when you are adding the flowers!
Add Your Flowers!

This is my favorite part of the process. When everything comes together! (Plus...flowers )
I have some general guides to help you get started but this is all about creative expression and finding what you love the most!
- The first flower I add in is usually either the largest or a flower I only have one of (basically, the feature flower). I place it off center to create some intrique.
- If you have multiple flowers painted in a similar style/color, make sure they are spread pretty evenly throughout the bouquet. Work in triangles if you can.
- Add in smaller flowers last to fill in any holes that you see.
- Readjust the greenery and filler as needed.
- Wrap the stems in floral tape, vinyl tape or zip ties as you go.
Eventually, I promise, it will start to look great!
Pop Your Bouquet in a Vase!

When you are happy with the shape and how the bouquet looks, pop it in a vase! There is a good chance the stems may be too long so take your wire cutters and trim the stems until the arrangement is able to sit in the vase without tipping.
The best part of making a bouquet/centerpiece arrangement this way? You can change out your flowers or vases anytime for a new or updated look!
Happy crafting and please let me know if you have any questions along the way!
xo - Stefanie
© 2026 Oh! You're Lovely - Sola Wood Flowers, All rights reserved. |
